Milky Cheese Donuts- Delicious Sweet & Savory Treat
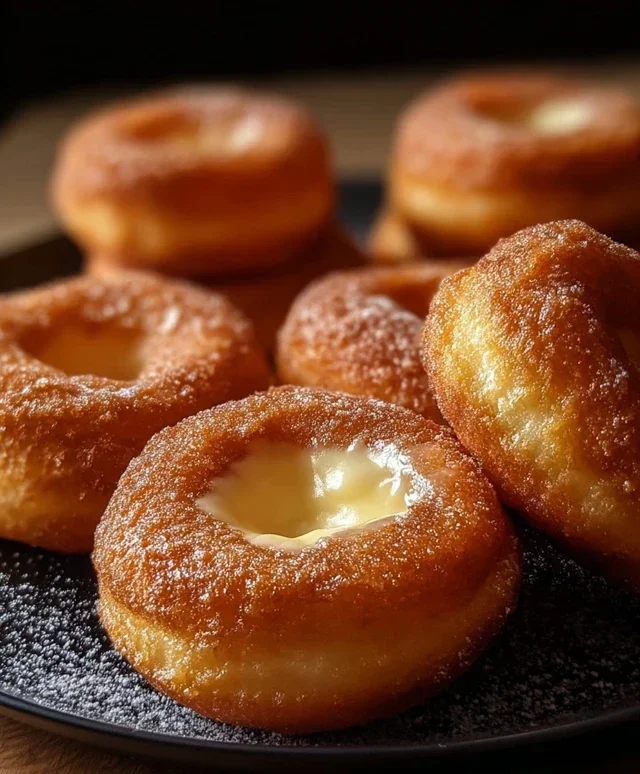
Milky Cheese Donuts are a revelation, a sweet and savory dream that will have you questioning everything you thought you knew about donuts. Forget your standard sugar-glazed rings; these are a whole other league of delicious. Imagin extracte biting into a pillowy soft donut, its exterior kissed with a delicate crisp, only to be met with a warm, gooey interior bursting with the subtle tang of cheese and a hint of milky sweetness. This isn’t just a dessert; it’s an experience. We love these Milky Cheese Donuts because they perfectly balance comforting sweetness with a surprising cheesy depth. They’re the ultimate crowd-pleaser, adaptable for breakfast, brunch, or even as a unique appetizer. What makes them truly special is that unexpected marriage of flavors – the creamy richness of milk and cheese that melts in your mouth, creating a truly unforgettable treat.
Milky Cheese Donuts
There’s something truly magical about a warm, slightly sweet, and delightfully cheesy donut. Forget the sugary glazed versions for a moment and imagin extracte a donut with a subtle savory whisper, a melt-in-your-mouth interior, and a crisp, golden exterior. That’s the promise of these Milky Cheese Donuts, and let me tell you, they deliver! These aren’t your typical donut shop fare; they’re a delightful fusion that works surprisingly well, offering a unique twist that’s perfect for a brunch, a snack, or even a playful appetizer. The tender dough, enriched with milk and a touch of sugar, provides the perfect canvas for the mild, creamy mozzarella that melts into gooey pockets as it cooks.
This recipe is surprisingly straightforward, and the results are so rewarding. We’ll be creating a simple yeast-risen dough, allowing it to puff up beautifully, then frying them to golden perfection. The optional dusting of powdered sugar adds a delightful contrast, balancing the savory cheese with a hint of sweetness.
Ingredients:
Cooking Instructions:
The journey to these delectable Milky Cheese Donuts begin extracts with activating our yeast. In a large mixing bowl, or the bowl of your stand mixer fitted with a dough hook, combine the warm milk, sugar, and active dry yeast. Give it a gentle stir to ensure the yeast is submerged. Let this mixture sit for about 5 to 10 minutes. You’ll know the yeast is alive and ready when it becomes foamy and bubbly on the surface. This is a crucial step, as it proves your yeast is active and will help our donuts rise to their full, fluffy potential. If you don’t see any foam, your yeast might be old or the milk might have been too hot or too cold, and you’ll want to start this step again with fresh yeast.
Once your yeast is bloomed, it’s time to add the rest of the wet ingredients and the dry ingredients (except for the cheese and frying oil, of course). To the foamy yeast mixture, add the large egg and the melted unsalted butter. Whisk them in gently. Next, add the all-purpose flour and the salt. If you’re using a stand mixer, begin extract mixing on low speed until the ingredients just start to come together into a shaggy dough. If you’re mixing by hand, use a wooden spoon or spatula. Once it starts to form a cohesive mass, it’s time to knead.
Now, we knead the dough until it’s smooth and elastic. If using a stand mixer, increase the speed to medium-low and knead for about 6 to 8 minutes. The dough should pull away from the sides of the bowl and become smooth and pliable. If you’re kneading by hand, turn the dough out onto a lightly floured surface and knead for about 8 to 10 minutes. Push the dough away from you with the heels of your hands, then fold it back over itself. Repeat this motion, rotating the dough occasionally, until it’s no longer sticky and feels wonderfully elastic. You can perform the “windowpane test” by gently stretching a small piece of dough; if you can stretch it thin enough to see light through it without it tearing, it’s ready.
After kneading, it’s time for the first rise. Lightly grease a clean bowl with a little oil. Place the kneaded dough into the bowl, turning it to coat all sides. Cover the bowl tightly with plastic wrap or a clean kitchen towel. Find a warm, draft-free spot in your kitchen for the dough to rise. This can be on top of your refrigerator, in a slightly warmed (then turned off) oven, or just in a cozy corner. Let the dough rise for about 1 to 1.5 hours, or until it has doubled in size. Patience here is key for a light and airy donut.
Once the dough has doubled, it’s time to incorporate that wonderful mozzarella. Gently punch down the risen dough to deflate it. Turn the dough out onto a lightly floured surface and gently flatten it into a rectangle. Sprinkle the shredded mozzarella cheese evenly over the surface of the dough. Now, fold the dough over itself a few times, like you’re making a letter fold, to distribute the cheese throughout the dough. Be gentle; we don’t want to overwork it at this stage. You’re aiming for pockets of cheese, not a uniformly mixed dough.
Now, we’ll shape our donuts. You can either roll out the dough to about ½ inch thickness and use a donut cutter, or simply cut the dough into small squares or rounds, about 2-3 inches in diameter. If you’re cutting, you can use a biscuit cutter or even the rim of a glass. For the classic donut hole, simply roll small pieces of dough into balls. Place the shaped donuts onto a baking sheet lined with parchment paper, leaving a little space between them. Cover them loosely with plastic wrap and let them rest for another 20 to 30 minutes, allowing them to puff up slightly before frying. This second proofing is important for a tender crum extractb.
The final, and arguably most exciting, step is frying! In a heavy-bottomed pot or Dutch oven, pour enough vegetable or canola oil to reach a depth of about 2 to 3 inches. Heat the oil over medium heat until it reaches about 350°F (175°C). It’s essential to maintain this temperature; too hot and the donuts will burn on the outside while remaining raw inside, and too cool and they’ll absorb too much oil and become greasy. You can test the temperature by dropping a tiny piece of dough into the oil; it should sizzle immediately and float to the surface. Carefully, and in batches, gently place the donuts into the hot oil. Don’t overcrowd the pot, as this will lower the oil temperature. Fry each donut for about 1 to 2 minutes per side, or until they are a beautiful golden brown. Use a slotted spoon or spider strainer to carefully remove the donuts from the oil and place them on a wire rack set over a baking sheet to drain any excess oil. If you’re dusting with powdered sugar, do it while the donuts are still warm, allowing the sugar to adhere to the surface. Enjoy these unique and delicious Milky Cheese Donuts warm!

Conclusion:
There you have it – a simple yet incredibly rewarding recipe for Milky Cheese Donuts! These delightful treats are a fantastic way to elevate your baking game, offering a unique blend of creamy richness and comforting sweetness that’s truly irresistible. The magic lies in the perfect balance of milk and cheese, creating a tender, slightly tangy dough that bakes up beautifully golden and wonderfully aromatic. Whether you’re looking for a special weekend breakfast, a delightful afternoon pick-me-me-up, or a crowd-pleasing dessert, these milky cheese donuts are sure to be a hit. I truly encourage you to give this recipe a try; the aroma alone will have your kitchen smelling divine, and the taste will have everyone asking for seconds!
For serving, these donuts are absolutely divine served warm, perhaps with a dusting of powdered sugar or a drizzle of honey. They also pair wonderfully with a cup of coffee or tea. If you’re feeling adventurous, consider adding a sprinkle of finely chopped chives or a pinch of black pepper to the dough for a savory twist, or even a touch of nutmeg for a warmer, sweeter profile. Don’t be afraid to experiment and make these milky cheese donuts your own!
Frequently Asked Questions:
Can I use a different type of cheese?
While the recipe is designed for a specific cheese for optimal texture and flavor, you could experiment with mild, finely grated cheeses like cheddar or Gruyere for a different taste. However, avoid overly sharp or crum extractbly cheeses, as they might not melt as smoothly.
How should I store leftover donuts?
Store any leftover milky cheese donuts in an airtight container at room temperature for up to two days. For longer storage, you can refrigerate them, but they are best enjoyed fresh.
Can these donuts be made ahead of time?
Yes, you can prepare the dough a day in advance and refrigerate it. Allow it to come to room temperature slightly before shaping and baking. The baked donuts are best consumed the same day they are made for the freshest taste and texture.
Milky Cheese Donuts
Delicious and slightly savory donuts with a creamy cheese filling, perfect for a unique treat.
Ingredients
-
2 cups all-purpose flour
-
1 cup whole milk, warm (about 110°F)
-
2 tablespoons sugar
-
2¼ teaspoons active dry yeast (1 packet)
-
½ teaspoon salt
-
1 large egg
-
4 tablespoons unsalted butter, melted
-
1 cup shredded mozzarella cheese
-
Vegetable or canola oil, for frying
-
Powdered sugar, for dusting (optional)
Instructions
-
Step 1
In a large bowl, combine warm milk, sugar, and yeast. Let it sit for 5-10 minutes until foamy. -
Step 2
Stir in the egg, melted butter, and salt into the yeast mixture. -
Step 3
Gradually add the flour, mixing until a soft dough forms. Knead for 5-7 minutes until smooth and elastic. -
Step 4
Place the dough in a greased bowl, cover, and let rise in a warm place for 1-1.5 hours, or until doubled in size. -
Step 5
Punch down the dough, roll it out to about ½ inch thickness, and cut out donut shapes. Place shredded mozzarella in the center of half the donuts, top with the remaining donut halves, and press edges to seal. -
Step 6
Heat vegetable or canola oil in a deep pot to 350°F (175°C). Fry donuts in batches for 2-3 minutes per side until golden brown. -
Step 7
Drain donuts on paper towels and dust with powdered sugar, if desired.
Important Information
Nutrition Facts (Per Serving)
It is important to consider this information as approximate and not to use it as definitive health advice.
Allergy Information
Please check ingredients for potential allergens and consult a health professional if in doubt.