Easy Bunny Cake Recipe- Simple & Sweet Fun
Easy Bunny Cake Recipe: Get ready to hop into springtime fun with this absolutely delightful easy bunny cake recipe! If you’re looking for a way to add a touch of whimsical charm to your celebrations, or simply want to bake something that screams “adorable,” then this is the perfect treat for you. We all love a cake that’s not only visually stunning but also incredibly simple to put together, and this bunny cake delivers on both fronts. Its appeal lies in its festive spirit, making it a beloved centerpiece for Easter brunches, spring birthdays, or just a fun weekend baking project with the kids. What truly makes this easy bunny cake recipe special is its adaptability – you can easily customize the frosting colors and decorations to match any theme or personal preference. Prepare for smiles all around as you unveil this charming creation!
Easy Bunny Cake Recipe
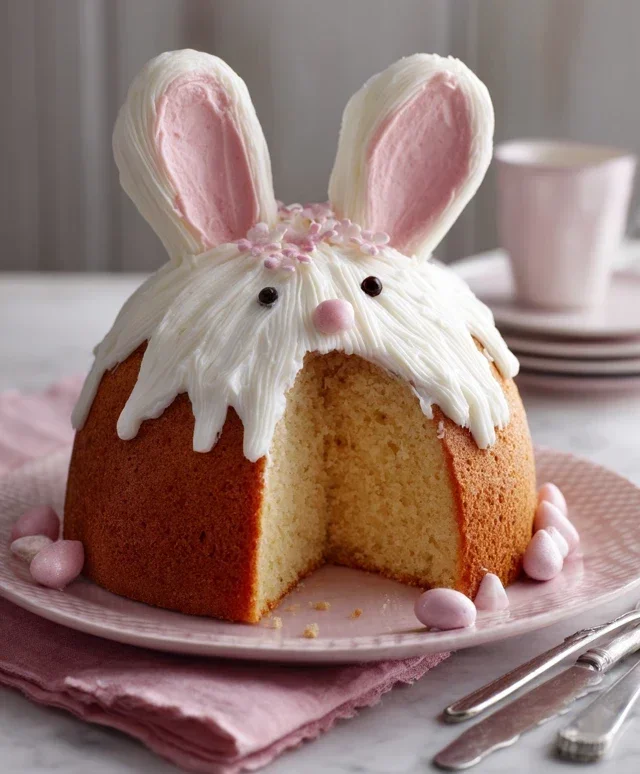
There’s something undeniably cheerful about a bunny cake, especially around Easter or for a whimsical spring celebration. This recipe is designed to be incredibly straightforward, making it perfect for bakers of all skill levels, even those who might be new to decorating. We’re going to transform two simple round cake layers into an adorable bunny that’s as fun to make as it is to eat. Forget complicated shaping or fiddly fondant; this bunny is all about simple assembly and sweet, festive decoration.
Ingredients:
Getting Started: Assembling Your Bunny Base
The foundation of our bunny is two perfectly baked round cake layers. Make sure they are completely cooled before you begin extract decorating. This is crucial! Warm cakes will melt the frosting, leading to a messy situation. If you’re using cake mix, follow the box instructions. If you’re baking from scratch, use your favorite reliable recipe. Once cooled, we’ll transform these simple rounds into the bunny’s body and head.
First, place one round cake layer flat on your serving platter or cake board. This will be the bunny’s body. Now, take your second round cake layer and, using a sharp knife, cut it in half. One of these halves will become the bunny’s head, and the other half will be used to create the bunny’s ears. We’ll refine the ears shortly.
Now, it’s time to frost the body. Generously apply a layer of white frosting all over the top of the bottom cake layer, spreading it evenly to the edges. Don’t worry about making it perfectly smooth at this stage; we’ll be adding more texture later.
Next, position the semi-circular cake half on top of the frosted body layer. It should sit slightly forward, creating the effect of a bunny’s head peeking over its body. Use a little frosting to help secure it in place if needed. Once the head is in position, begin extract frosting it with white frosting, ensuring you cover all the exposed cake surfaces. Again, don’t stress about perfection; the frosting will be a canvas for our decorative touches.
Creating the Bunny’s Ears and Details
Now for the ears! Take the remaining cake half from the second layer. You can either cut this half into two slightly different sized pieces for ears, or, for a more uniform look, you can trim the edges to make two more defined ear shapes. If you want longer, more slender ears, you might even consider cutting thin rectangles from cake scraps if you have any. Place these ear shapes on top of the bunny’s head, angling them slightly backward or to the sides as you desire. Secure them with a little frosting.
Once your bunny is assembled and lightly frosted, it’s time to bring it to life with color and detail. This is where the fun really begin extracts!
Decorating Your Adorable Bunny
This is where your piping bags come into play. Fill one piping bag with your pink frosting. Fit it with a small round tip or a star tip. We’re going to use this to create the inner part of the bunny’s ears. Carefully pipe the pink frosting onto the inner surface of each ear. If you trimmed your ears into more defined shapes, you can pipe a solid pink layer. If you’re using simple cake halves, you can pipe a pink “blob” in the center of each ear, resembling the fleshy part.
Next, prepare your chocolate icing or melted chocolate. Fill a piping bag with this, fitted with a very fine tip. This is for drawing the facial features. You can draw two simple black dots for eyes, a small upside-down triangle for the nose, and a few delicate lines extending from the nose to create whiskers. Take your time here, as these are the details that really make your bunny recognizable!
Now, for the texture. If you want to create a fluffy fur effect, you can either use a grass tip on your white frosting piping bag to pipe little strands of fur all over the bunny’s body and head, or you can use the back of a spoon to create soft swirls and indentations in the white frosting. Both methods give a charming, homemade look. If you’re short on time or want a smoother finish, simply ensure your white frosting is well-applied to cover all the cake.
Finally, let’s add a festive touch with the jellybeans or colorful candies. You can arrange them in a line down the bunny’s “chest,” place them around the base of the cake, or even create a little “tail” by sticking a few candies together on the back. This is your chance to get creative!
Tips for Bunny Cake Success
This Easy Bunny Cake Recipe is a delightful way to add a touch of sweetness and whimsy to any springtime gathering. Enjoy the process, and most importantly, enjoy the delicious results!
Conclusion:
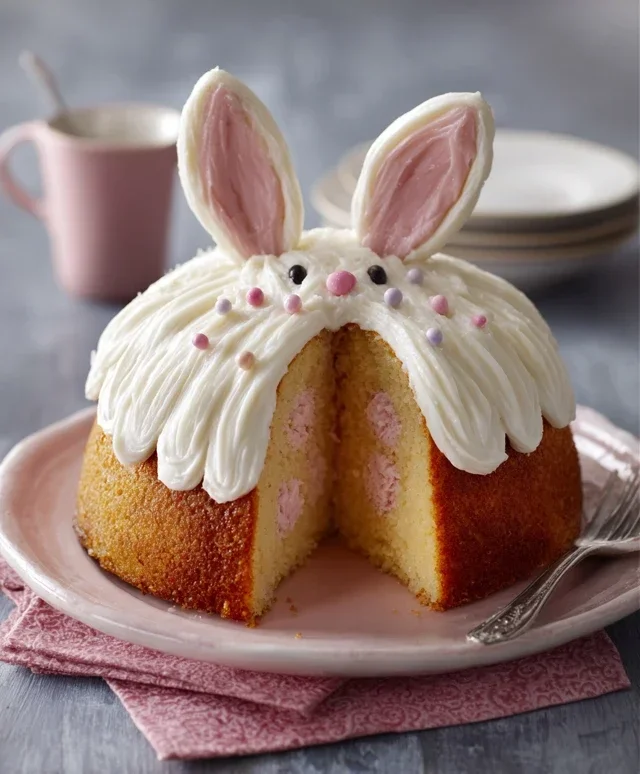
I hope you’ve enjoyed learning how to make this incredibly delightful andEasy Bunny Cake Recipe! It truly is a fantastic choice for so many reasons. It’s simple enough for even begin extractner bakers, uses readily available ingredients, and the end result is absolutely adorable, making it perfect for Easter, spring birthdays, or just a fun weekend treat. The fluffy cake combined with the sweet frosting and playful bunny decorations is sure to bring smiles to everyone’s faces. Don’t be afraid to get creative with your decorating!
This cake is wonderful served as is, but you could also pair it with a scoop of vanilla ice cream for an extra indulgence. For variations, consider adding a touch of lemon zest to the cake batter for a bright citrus note, or perhaps a swirl of strawberry puree for a beautiful pink hue and fruity flavor. You could also experiment with different edible decorations to make your bunny unique! I truly encourage you to give this recipe a try. It’s a rewarding baking experience that results in a treat that’s as delicious as it is charming.
Frequently Asked Questions:
Can I make this cake ahead of time?
Yes, you absolutely can! The cake layers can be baked a day in advance and stored at room temperature, wrapped tightly in plastic wrap. The frosting can also be made ahead and refrigerated, but you’ll want to bring it back to room temperature and re-whip it before frosting the cooled cake.
What if I don’t have a bunny-shaped cake pan?
No problem at all! You can bake this recipe in two round cake pans and then carve the cake into a bunny shape. Alternatively, bake cupcakes and decorate them with bunny ears and a puff of frosting for a tail. Get creative!
Can I use a different type of frosting?
Certainly! While buttercream is classic and delicious, feel free to use your favorite frosting. A cream cheese frosting would add a lovely tang, or a simple glaze could also work if you prefer something lighter.
Easy Bunny Cake Recipe
A simple and adorable bunny-shaped cake perfect for Easter or any springtime celebration.
Ingredients
-
Two round cake layers (use one cake mix or your favorite homemade recipe)
-
White frosting (ready-made or your favorite homemade recipe)
-
Pink frosting (or use pink gel food coloring on white frosting)
-
Chocolate icing or melted chocolate for details
-
Jellybeans or colorful round candies
-
Piping bags
Instructions
-
Step 1
Prepare and bake your two round cake layers according to package directions or your favorite recipe. Let them cool completely. -
Step 2
Place one cake layer on your serving plate. Spread a generous amount of white frosting over the top. -
Step 3
Place the second cake layer on top of the first. Frost the entire cake with white frosting, creating a smooth surface. -
Step 4
Using pink frosting (or white frosting tinted pink), pipe two large circles on the top of the cake for the bunny’s ears. You can also add smaller pink circles inside for the inner ear. -
Step 5
Use chocolate icing or melted chocolate to pipe two small dots for eyes and a small triangle or heart shape for the nose. Add whiskers if desired. -
Step 6
Decorate the bunny’s cheeks with jellybeans or colorful round candies. You can also use them to outline the ears or add other festive touches.
Important Information
Nutrition Facts (Per Serving)
It is important to consider this information as approximate and not to use it as definitive health advice.
Allergy Information
Please check ingredients for potential allergens and consult a health professional if in doubt.