Easy Homemade Fruit Leather Recipe-Sweet & Healthy Treat
Homemade fruit leather recipes are a delightful journey back to childhood, a vibrant explosion of pure fruit flavor that’s both fun to make and incredibly satisfying to eat. Forget the artificial colors and questionable ingredients of store-bought varieties; this homemade fruit leather recipe lets you control exactly what goes in, making it a healthier and tastier alternative for everyone. We all love a treat that’s naturally sweet and bursting with sunshine, and fruit leather delivers on all fronts. What truly makes this homemade fruit leather recipe special is its simplicity and versatility. You can use almost any fruit you have on hand, transforming ripe, seasonal produce into chewy, pliable strips of pure deliciousness. It’s the perfect way to use up a bounty of berries, peaches, or even a mix of your favorites, creating a snack that’s as beautiful as it is delicious.
Why You’ll Love This Recipe
Pure Fruit Goodness
This homemade fruit leather recipe celebrates the natural sweetness and vibrant flavors of fresh fruit. It’s a guilt-free indulgence that’s packed with vitamins and fiber.
Homemade Fruit Leather Recipe
There’s something incredibly satisfying about making your own fruit leather. It’s a simple, healthy, and delicious way to preserve the sweetness of fresh fruit and create a chewy, tangy treat that kids and adults alike will adore. Forget the store-bought versions filled with artificial colors and flavors; this homemade recipe uses just a few natural ingredients to capture the pure essence of your favorite fruits. It’s the perfect project for a lazy afternoon, a way to use up an abundance of ripe produce, and a fantastic activity to get your little ones involved in the kitchen. The process is surprisingly straightforward, and the reward is a pantry staple that’s both fun and wholesome.
Ingredients:
Let’s Get Cooking:
Preparing your fruit is the first crucial step. Ensure your chosen fruits are ripe and fragrant, as this will translate directly into the flavor of your fruit leather. Wash them thoroughly and then chop them into roughly uniform pieces. If you’re using tougher fruits like apples, you might want to peel them first, though it’s not strictly necessary if you have a powerful blender or food processor. For berries, simply rinse and add them to the blender. If you’re aiming for a smoother texture, you can even cook softer fruits like peaches or mangoes gently for a few minutes before pureeing. The goal is to have a smooth, thick puree that will cook down evenly.
1. Puree Your Fruit: Once your fruit is chopped, it’s time to transform it into a smooth puree. I highly recommend using a good quality blender or food processor for this step. Add your chopped fruit to the blender. If you’re using a very dry fruit like dried apricots (though fresh is preferred for this recipe), you might need to add a tablespoon or two of water to help it blend. For fresh, juicy fruits, you shouldn’t need any extra liquid. Blend until you achieve a completely smooth consistency, with no chunks remaining. The smoother the puree, the more uniform your fruit leather will be. If you like a bit of texture, you can pulse it a few times less, but for classic fruit leather, smooth is best.
2. Sweeten and Brighten: Now it’s time to add the sugar and lemon juice. The sugar will not only enhance the natural sweetness of the fruit but also act as a preservative, helping the fruit leather to last longer. The amount of sugar can be adjusted based on how sweet your fruit is naturally. Taste a bit of your fruit puree before adding sugar; if it’s very tart, you might want to add an extra tablespoon. The lemon juice is vital for a few reasons. Firstly, it adds a lovely tangin extractess that balances the sweetness, making the fruit leather more complex and enjoyable. Secondly, it helps to preserve the vibrant color of the fruit, preventing it from browning as it dries. Stir in the sugar and lemon juice until fully incorporated. Give it another quick blend or stir to ensure everything is well combined.
3. Prepare for Baking: Preheat your oven to its lowest setting, typically around 170°F (75°C) to 200°F (95°C). It’s important to use a low temperature to dry the fruit leather rather than bake it, which would result in a crispy, brittle product instead of a chewy one. Line a baking sheet with parchment paper or a silicone baking mat. Ensure the parchment paper covers the entire surface of the baking sheet, as you want the fruit mixture to spread thinly and evenly. Pour your fruit puree onto the prepared baking sheet.
4. Spread Thinly and Evenly: This is a crucial step for even drying. Using an offset spatula or the back of a spoon, spread the fruit puree as thinly and evenly as possible across the parchment paper. Aim for a thickness of about 1/8 to 1/4 inch. A thinner layer will dry faster, while a thicker layer will take longer and might result in a stickier texture if not dried completely. Try to get the edges as smooth as the center. This evenness is key to achieving a consistently chewy texture throughout your fruit leather. If you’re making multiple batches, you can do them one at a time or use two baking sheets if your oven allows for even heat distribution.
5. The Drying Process: Carefully place the baking sheet into your preheated oven. You’ll want to leave the oven door slightly ajar to allow moisture to escape. A wooden spoon or a small heat-proof wedge can be used to prop the door open. This allows steam to vent, which is essential for the drying process. The fruit leather will need to dry for several hours, typically between 4 to 8 hours, depending on the thickness of your puree, the humidity in your kitchen, and the exact temperature of your oven. Check on it periodically. You’ll know it’s ready when the surface is no longer sticky to the touch and the edges are begin extractning to peel away from the parchment paper. It should be pliable and slightly leathery, not brittle or wet. If you press it gently, it should spring back slightly.
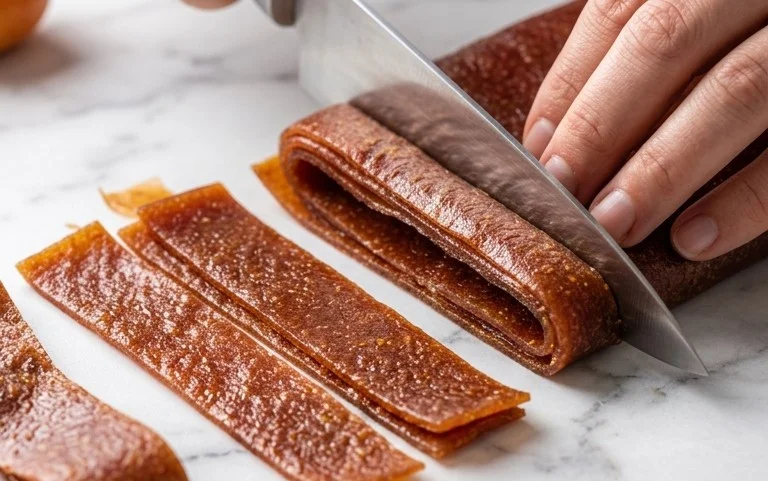
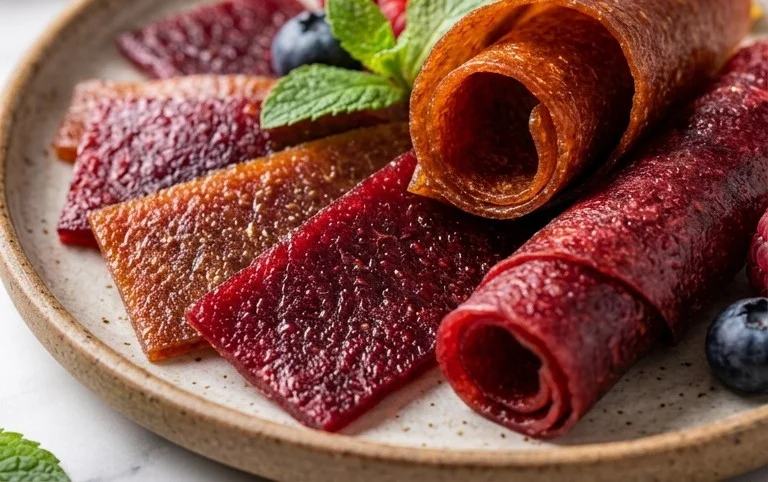
6. Cool and Cut: Once your fruit leather is dried to perfection, carefully remove the baking sheet from the oven. Let it cool completely on the baking sheet. This cooling period is important as the fruit leather will firm up a bit more as it cools. Once cooled, you can gently peel the entire sheet of fruit leather off the parchment paper. Now comes the fun part – cutting it into strips or shapes. You can use a pizza cutter or a sharp knife to cut it into long strips, which are easy to roll up. Alternatively, you can use cookie cutters to create fun shapes for the kids.
7. Storage: To store your homemade fruit leather, I recommend rolling up the strips tightly or cutting shapes and then wrapping them individually in plastic wrap or wax paper. This helps to prevent them from sticking together and keeps them fresh. Store the wrapped fruit leather in an airtight container at room temperature for a week or two, or in the refrigerator for longer storage. Properly stored, it will maintain its chewy texture and delicious fruity flavor. Enjoy this delightful, homemade treat!
Conclusion:
Making your own homemade fruit leather recipe is an incredibly rewarding experience, offering a healthier and more delicious alternative to store-bought snacks. It’s a fantastic way to preserve the vibrant flavors of seasonal fruits and create a treat that’s perfect for lunchboxes, after-school snacks, or even a sophisticated dessert accompaniment. The simplicity of the process means anyone can achieve fantastic results, and the satisfaction of seeing your homemade fruit leather transform from a pureed fruit mixture to a chewy, flavorful sheet is immense. I truly encourage you to give this recipe a try – you might be surprised at how easy and enjoyable it is!
Serving suggestions are abundant! Enjoy your homemade fruit leather as a healthy snack on its own, cut into fun shapes for kids, or even chopped and sprinkled over yogurt or ice cream for a burst of fruity flavor. For variations, experiment with different fruit combinations. Think beyond the basics: try adding a pinch of cinnamon to apple leather, a squeeze of lime to mango, or even a few mint leaves for a refreshing twist. The possibilities are truly endless, limited only by your imagin extractation and the fruits you have on hand.
Frequently Asked Questions:
What is the best way to store homemade fruit leather?
Once completely cooled and cut into strips or pieces, it’s best to store your homemade fruit leather recipe creations in an airtight container at room temperature. If you live in a very humid climate, you might consider storing it in the refrigerator to prevent it from becoming sticky. Properly stored, it can last for several weeks.
Can I use frozen fruit for this recipe?
Absolutely! Frozen fruit is an excellent and often more economical option for making fruit leather. Simply thaw the frozen fruit completely before pureeing it, just as you would with fresh fruit. You might need to drain off any excess liquid that collects during thawing, but otherwise, it works wonderfully.
My fruit leather is too sticky. How can I fix it?
A slightly sticky texture is normal, but if it’s excessively so, it likely needs a bit more drying time. You can return it to the oven on a very low setting (around 150°F or 65°C) with the door slightly ajar for another 30-60 minutes, or until it reaches your desired consistency. Ensure it’s fully cooled before attempting to cut it.
Homemade Fruit Leather
A simple and delicious way to make your own fruit leather at home with just a few ingredients.
Ingredients
-
2 cups fruit, chopped
-
3 tbsp white sugar
-
juice of ½ whole lemon
-
1/4 cup water
-
1 tsp vanilla extract
Instructions
-
Step 1
Prepare your fruit by washing, peeling (if necessary), and chopping it into small pieces. If using frozen fruit, thaw it completely. -
Step 2
In a saucepan, combine the chopped fruit, white sugar, and lemon juice. Add the water. -
Step 3
Cook over medium heat, stirring occasionally, until the fruit breaks down and the mixture thickens, about 10-15 minutes. Mash any larger fruit pieces with the back of a spoon. -
Step 4
Remove from heat and stir in the vanilla extract. -
Step 5
Line a baking sheet with parchment paper or a silicone baking mat. Pour the fruit mixture onto the prepared baking sheet and spread it thinly and evenly. -
Step 6
Bake in a preheated oven at 175°F (80°C) for 2-4 hours, or until the fruit leather is no longer sticky to the touch. The time will vary depending on the thickness. -
Step 7
Once cooled, peel the fruit leather off the parchment paper. Cut into strips or desired shapes.
Important Information
Nutrition Facts (Per Serving)
It is important to consider this information as approximate and not to use it as definitive health advice.
Allergy Information
Please check ingredients for potential allergens and consult a health professional if in doubt.